This article shows how to take a database backup using C# code and create a Windows application that makes our work user-friendly for database backup. Usually we do database backup using the SQL Server.
SQL Server Management Objects (also known as SMO) allows us to access the objects of Microsoft SQL Server. SMO is a .NET library. All functions available in SQL Server Management Studio is available in SMO but SMO has more features than Management Studio.
Step 1
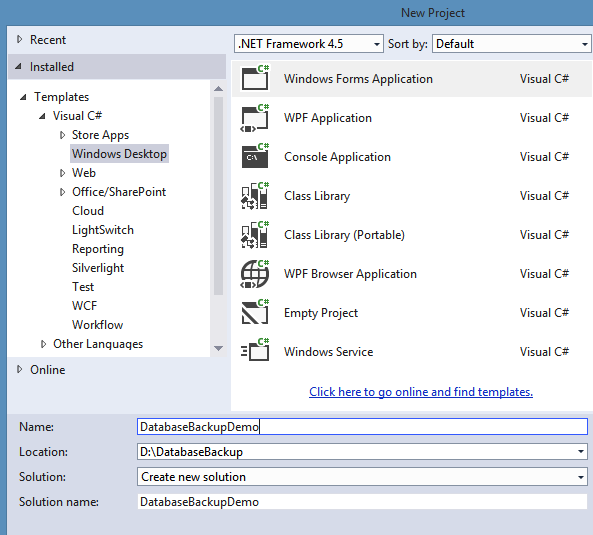
Open Visual Studio and choose a Windows application template and provide a nice name for the project.
Step 2
Design the form as in the following:
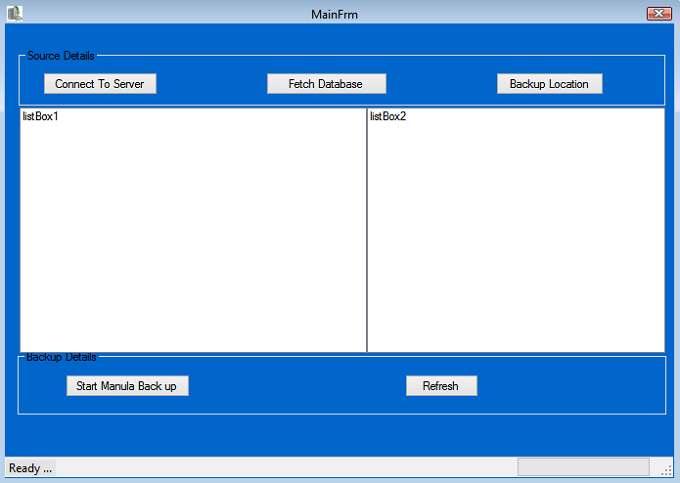
As in the preceding design of the application, when we click the Connect to the Server button there is a window open that asks for the credentials for the SQL database.
Another button "Fetch Database" allows fetching of the entire database inside the server that displays the the listbox as in the left side of the list box.
Another and last button is the "Backup Location" button for choosing the destination folder for where we to save the backup file.
Step 3
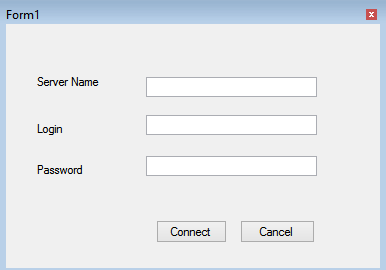
Design another Windows for login as in the following:
Step 4
Fetch all the databases inside the server.
Fetch all the databases inside the server.
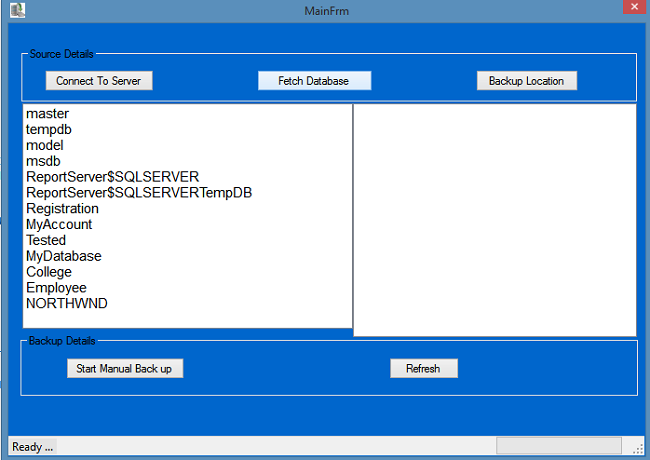
The following is the code for connecting to SQL Server and fetch the databases.
- serverName = textBox1.Text;
- userName = textBox2.Text;
- password = textBox3.Text;
- string str = "Data Source=" + textBox1.Text + ";User ID=" + textBox2.Text + ";Password=" + textBox3.Text + "";
- SqlConnection con = new SqlConnection(str);
- try
- {
- con.Open();
- // MessageBox.Show("connection gets established");
- SqlCommand cmd = new SqlCommand("SELECT db.[name] as dbname FROM [master].[sys].[databases] db", con);
- SqlDataAdapter sda = new SqlDataAdapter(cmd);
- sda.Fill(ds,"DatabaseName");
- con.Close();
- this.Close();
- }
- catch(Exception ex)
- {
- MessageBox.Show(ex.Message);
- }
Step 5
Choose the destination folder for where to keep the backup file.
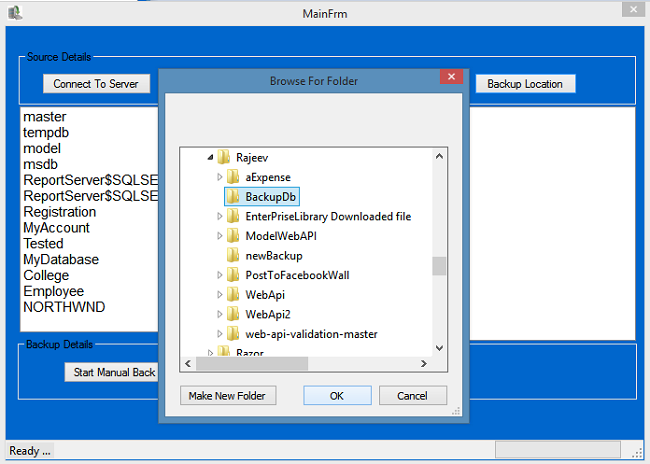
After choosing the destination folder, we need to select the database and destination folder for further operations.
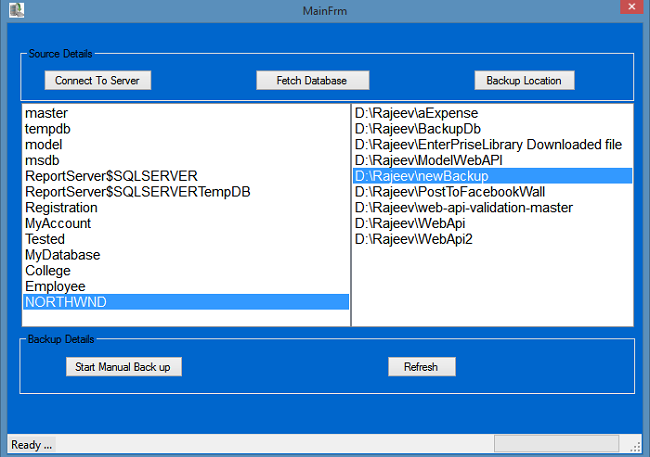
Step 6
We will now add a reference for Database Backup.
We need to add the following two very important namespaces.
- using Microsoft.SqlServer.Management.Smo;
- using Microsoft.SqlServer.Management.Common;
Step 7
We will now implement the code for the Database Backup.
After hitting the "Start Manual Back Up" button:
- private void button3_Click(object sender, EventArgs e)
- {
- try
- {
- if (DestPath == "" || DbName == "")
- {
- MessageBox.Show("Try to select Database and Destination Folder !");
- }
- else
- {
- string databaseName = DbName;//dataGridView1.Rows[e.RowIndex].Cells[e.ColumnIndex].FormattedValue.ToString();
- //Define a Backup object variable.
- Backup sqlBackup = new Backup();
- ////Specify the type of backup, the description, the name, and the database to be backed up.
- sqlBackup.Action = BackupActionType.Database;
- sqlBackup.BackupSetDescription = "BackUp of:" + databaseName + "on" + DateTime.Now.ToShortDateString();
- sqlBackup.BackupSetName = "FullBackUp";
- sqlBackup.Database = databaseName;
- ////Declare a BackupDeviceItem
- string destinationPath = DestPath;
- string backupfileName = DbName +".bak";
- BackupDeviceItem deviceItem = new BackupDeviceItem(destinationPath + "\\" + backupfileName, DeviceType.File);
- ////Define Server connection
- //ServerConnection connection = new ServerConnection(frm.serverName, frm.userName, frm.password);
- ServerConnection connection = new ServerConnection(Form1.serverName, Form1.userName, Form1.password);
- ////To Avoid TimeOut Exception
- Server sqlServer = new Server(connection);
- sqlServer.ConnectionContext.StatementTimeout = 60 * 60;
- Database db = sqlServer.Databases[databaseName];
- sqlBackup.Initialize = true;
- sqlBackup.Checksum = true;
- sqlBackup.ContinueAfterError = true;
- ////Add the device to the Backup object.
- sqlBackup.Devices.Add(deviceItem);
- ////Set the Incremental property to False to specify that this is a full database backup.
- sqlBackup.Incremental = false;
- sqlBackup.ExpirationDate = DateTime.Now.AddDays(3);
- ////Specify that the log must be truncated after the backup is complete.
- sqlBackup.LogTruncation = BackupTruncateLogType.Truncate;
- sqlBackup.FormatMedia = false;
- ////Run SqlBackup to perform the full database backup on the instance of SQL Server.
- sqlBackup.SqlBackup(sqlServer);
- ////Remove the backup device from the Backup object.
- sqlBackup.Devices.Remove(deviceItem);
- toolStripStatusLabel1.Text = "Successful backup is created!";
- }
- }
- catch (Exception ex)
- {
- toolStripStatusLabel1.Text = ex.Message;
- // MessageBox.Show(ex.Message);
- }
- }
Summary
In this article we learned how SMO helps to access the SQL operation in C#. We can use these namespaces and do whatever we want.
No comments:
Post a Comment