Download Files:
Introduction
In simple step I will show you to make you application globalize and localize in MVC 4.
I am writing this article because I found that there are not good and clean example of Globalization and Localization and many developer wont get any proper output from searching on Google . If you go hunting for Globalization and Localization for ASP.NET Webforms then you will get many cool example on this.
I to wrote Globalization and Localization in ASP.NET Webforms here is URL you can have a look at it: What is Globalization and Localization in ASP.Net.
Before starting let's have look at definition of globalization and localization below.
What is Globalization and Localization?
Globalization is the process of designing the application in such a way that it can be used by users from across the globe (multiple cultures).
Localization, on the other hand, is the process of customization to make our application behave depending on the current culture and locale. These two things go together.

Image is used from: Globalization.
Getting Started
Create MVC application
In Visual Studio 2013 select "File" from the menu and inside that select Project and then a New Dialog will popup with the name New project.
Inside that select Templates then select Visual C# and then inside that select web then select ASP.NET MVC 4 Web Application. Name your project "MvcLocalization" and then click OK.
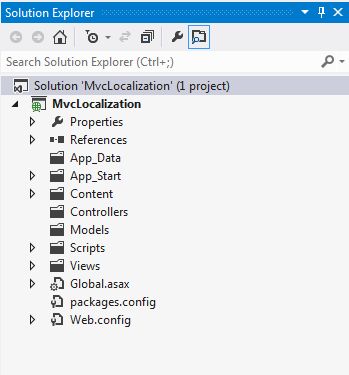
After this let's start with adding a resource to your application.
Before adding a resource I am will just create a folder named “LocalResource” and inside this I will add a resource.
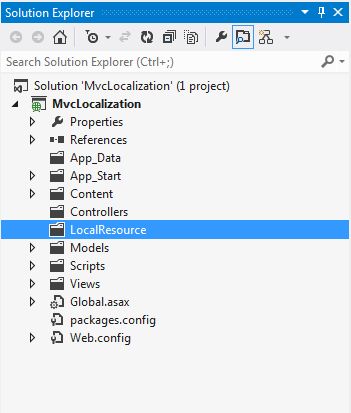
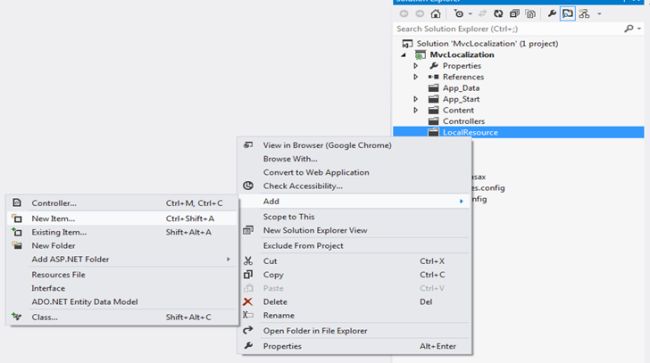
Now to add the resource
A New Dialog will popup with name the Add New Item.
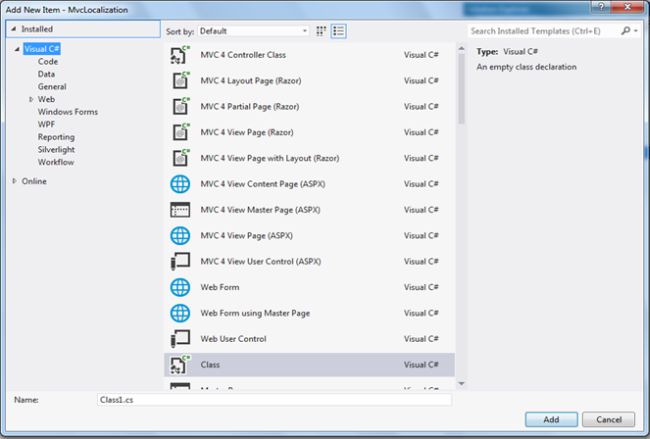
Inside the new dialog at the right side is a search box, type resource.
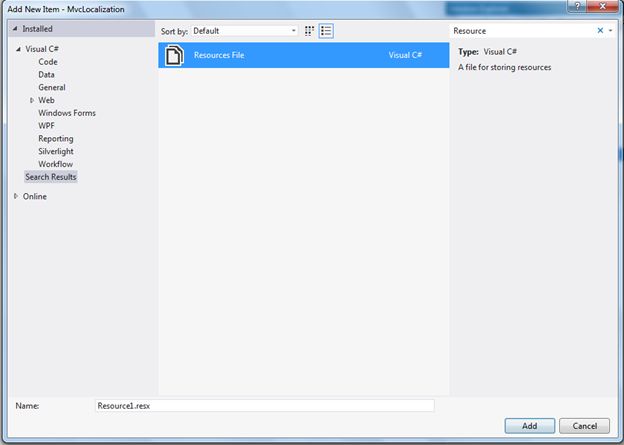
Then I will name my first resource file “Resource.resx”.
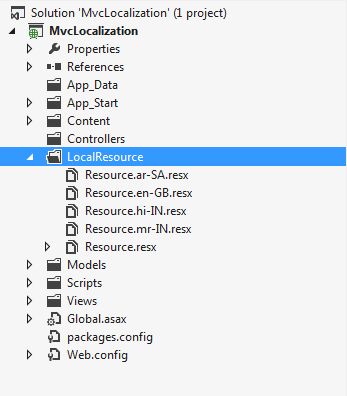
In a similar way we will add all other resources with the given names as above.
After adding all the resources your LocalResource folder will look as in the following snapshot.
1. Add some data
Let us add some data to these files. Open "Resource.resx".

Then just check the Access Modifier dropdownlist and make it Public.
Add a name under the "Resource.resx" Filename column and keep the Value column blank as in the following:

Save and close Resource.resx.
2. Open "Resource.en-GB.resx"
Add a name under the "Resource.en-GB.resx" filename and the value that you want to display in the value field.

3. Open Resource.hi-IN.resx
Add a name under the "Resource.hi-IN.resx" filename and the value that you want to display in the value field.

4. Open "Resource.mr-IN.resx"
Add a name under the "Resource.mr-IN.resx" filename and the value that you want to display in the value field.

5. Open "Resource.ar-SA.resx"
Add a name under the "Resource.ar-SA.resx" filename and the value that you want to display in the value field.

Adding Model and Attribute to Properties.
Now add a model with the name “Userdetails.cs” and then add a display attribute with the name similar to the resource “Name” column and then add ResourceType = typeof(Resource).
Adding custom class with name CultureHelper.cs
Now after completing the model now add a class with the name “CultureHelper.cs” in the new folder “Helper”. This class sets the Culture with the use of threading.
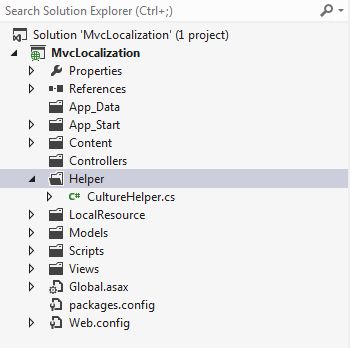
Here is a code snippet of the CultureHelper class.
After adding CultureHelper now we are moving to the Controller.
Adding Controller
In this part we will add 2 Controllers.
BaseController
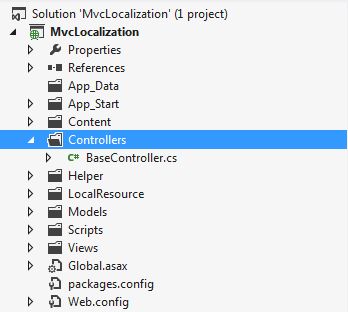
Here is a code snippet of BaseController.
HomeController
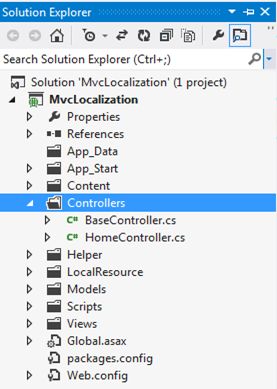
Here is a code snippet of HomeController.
After this we will work on View.
We will first work on _LoginPartial.cshtml because we will add a link button on this page to display it on all pages of the website / application.
_LoginPartial.cshtml code snippet
Here is the link from where the user will be able to change his website Language.
As we have decided for what language we will use that code.
English :- 0 | Hindi:- 1 | Marathi :- 2 | Arabic :- 3

When the user clicks on this link it will call the Home Controller ChangeCurrentCulture Action result and it will pass an id to it.
According to that CultureHelper will get input and it will set the Culture for the page.
Adding View for HomeController
For adding a View just right-click anywhere inside HomeController and select Add View.
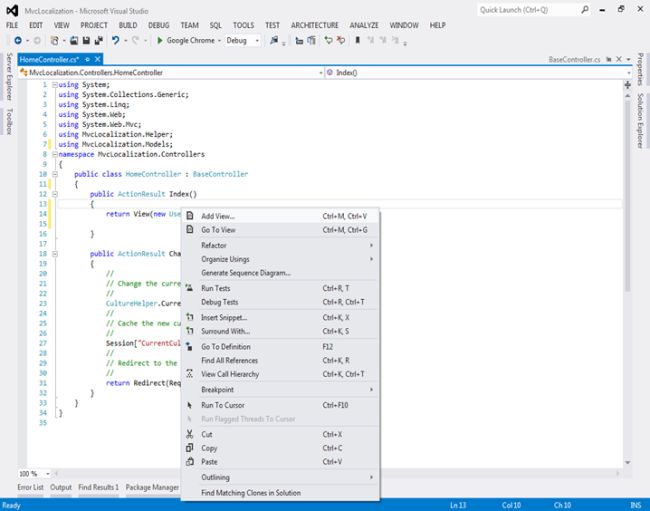
After clicking Add View a new dialog will popup with the name Add View. Inside that you need to select:
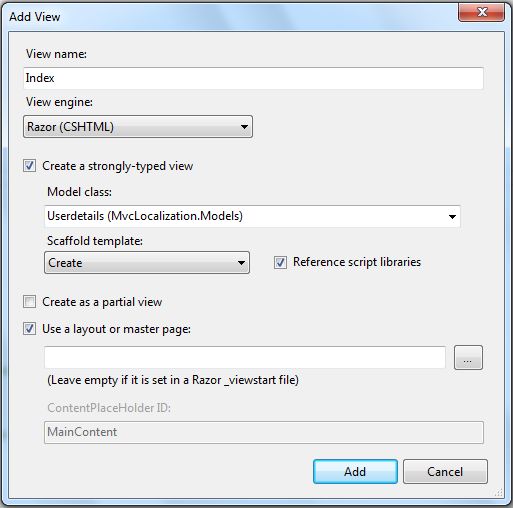
And click on the Add button.
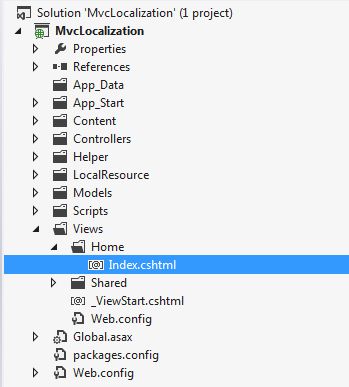
When adding a view using a Scaffold template all the code for the view will be generated.
Index.cshtml code snippet.
Now we have completely configured the code. Now we just need to run the application and check it.
Complete view of page
It's taking the default culture, English, when it loads the first time.
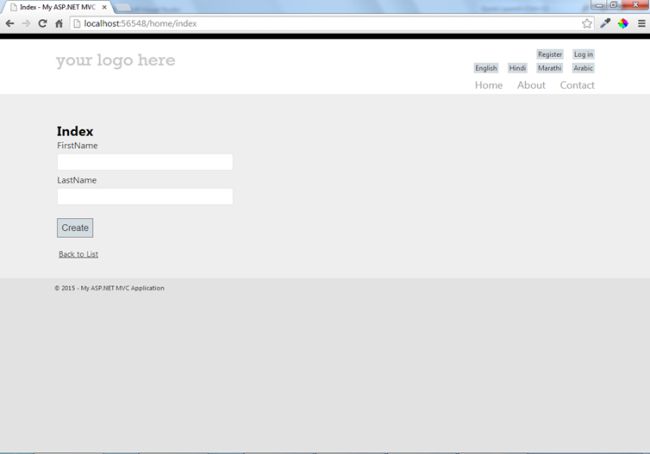
Here is the link we added.

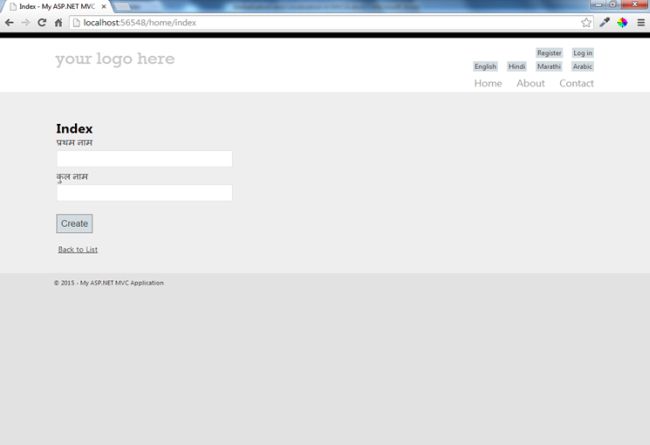
Let's check it by clicking on Hindi first:
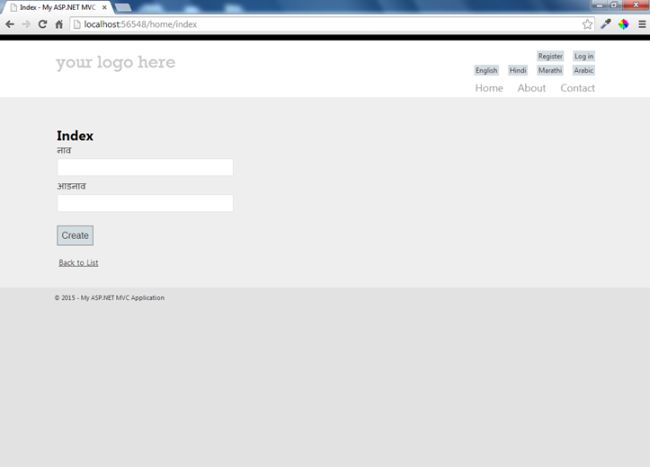
Now to click on Marathi.
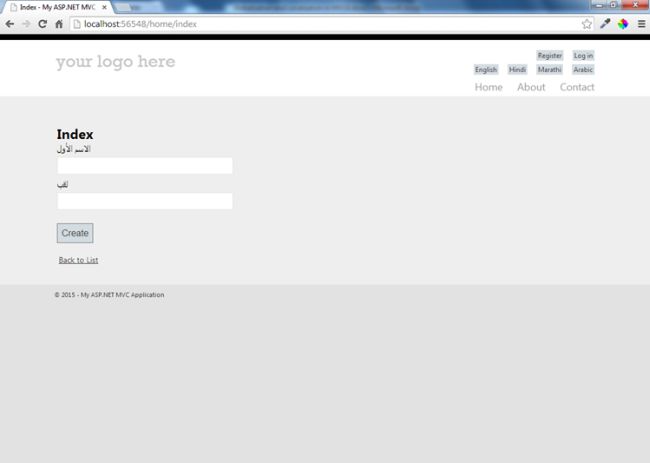
And finally click on Arabic.
Conclusion
Finally we have completed Globalization and Localization in ASP.NET MVC 4. I hope you have enjoyed it.
You can download this code from the preceding link.
Like this article if you have enjoyed reading it.
Introduction
In simple step I will show you to make you application globalize and localize in MVC 4.
I am writing this article because I found that there are not good and clean example of Globalization and Localization and many developer wont get any proper output from searching on Google . If you go hunting for Globalization and Localization for ASP.NET Webforms then you will get many cool example on this.
I to wrote Globalization and Localization in ASP.NET Webforms here is URL you can have a look at it: What is Globalization and Localization in ASP.Net.
Before starting let's have look at definition of globalization and localization below.
What is Globalization and Localization?
Globalization is the process of designing the application in such a way that it can be used by users from across the globe (multiple cultures).
Localization, on the other hand, is the process of customization to make our application behave depending on the current culture and locale. These two things go together.

Image is used from: Globalization.
Getting Started
Create MVC application
In Visual Studio 2013 select "File" from the menu and inside that select Project and then a New Dialog will popup with the name New project.
Inside that select Templates then select Visual C# and then inside that select web then select ASP.NET MVC 4 Web Application. Name your project "MvcLocalization" and then click OK.

After this let's start with adding a resource to your application.
Before adding a resource I am will just create a folder named “LocalResource” and inside this I will add a resource.

Now to add the resource
- The Main Resource should be “Resource.resx”.
- For the English you can add "Resource.en-GB.resx".
- For Marathi you can add "Resource.mr-IN.resx".
- For Hindi you can add "Resource.hi-IN.resx".
- For Arabic you can add "Resource.ar-SA.resx".

A New Dialog will popup with name the Add New Item.

Inside the new dialog at the right side is a search box, type resource.

Then I will name my first resource file “Resource.resx”.
In a similar way we will add all other resources with the given names as above.
After adding all the resources your LocalResource folder will look as in the following snapshot.

1. Add some data
Let us add some data to these files. Open "Resource.resx".

Then just check the Access Modifier dropdownlist and make it Public.
Add a name under the "Resource.resx" Filename column and keep the Value column blank as in the following:

Save and close Resource.resx.
2. Open "Resource.en-GB.resx"
Add a name under the "Resource.en-GB.resx" filename and the value that you want to display in the value field.

3. Open Resource.hi-IN.resx
Add a name under the "Resource.hi-IN.resx" filename and the value that you want to display in the value field.

4. Open "Resource.mr-IN.resx"
Add a name under the "Resource.mr-IN.resx" filename and the value that you want to display in the value field.

5. Open "Resource.ar-SA.resx"
Add a name under the "Resource.ar-SA.resx" filename and the value that you want to display in the value field.

Adding Model and Attribute to Properties.
Now add a model with the name “Userdetails.cs” and then add a display attribute with the name similar to the resource “Name” column and then add ResourceType = typeof(Resource).
- using System;
- using System.Collections.Generic;
- using System.ComponentModel.DataAnnotations;
- using System.Linq;
- using System.Web;
- using MvcLocalization.LocalResource;
- namespace MvcLocalization.Models
- {
- public class Userdetails
- {
- [Display(Name = "FirstName", ResourceType = typeof(Resource))]
- public string FirstName { get; set; }
- [Display(Name = "LastName", ResourceType = typeof(Resource))]
- public string LastName { get; set; }
- }
- }
Now after completing the model now add a class with the name “CultureHelper.cs” in the new folder “Helper”. This class sets the Culture with the use of threading.

Here is a code snippet of the CultureHelper class.
- using System;
- using System.Collections.Generic;
- using System.Linq;
- using System.Web;
- using System.Web.SessionState;
- using System.Threading;
- using System.Globalization;
- namespace MvcLocalization.Helper
- {
- public class CultureHelper
- {
- protected HttpSessionState session;
- //constructor
- public CultureHelper(HttpSessionState httpSessionState)
- {
- session = httpSessionState;
- }
- // Properties
- public static int CurrentCulture
- {
- get
- {
- if (Thread.CurrentThread.CurrentUICulture.Name == "en-GB")
- {
- return 0;
- }
- else if (Thread.CurrentThread.CurrentUICulture.Name == "hi-IN")
- {
- return 1;
- }
- else if (Thread.CurrentThread.CurrentUICulture.Name == "mr-IN")
- {
- return 2;
- }
- else if (Thread.CurrentThread.CurrentUICulture.Name == "ar-SA")
- {
- return 3;
- }
- else
- {
- return 0;
- }
- }
- set
- {
- if (value == 0)
- {
- Thread.CurrentThread.CurrentUICulture = new CultureInfo("en-GB");
- }
- else if (value == 1)
- {
- Thread.CurrentThread.CurrentUICulture = new CultureInfo("hi-IN");
- }
- else if (value == 2)
- {
- Thread.CurrentThread.CurrentUICulture = new CultureInfo("mr-IN");
- }
- else if (value == 3)
- {
- Thread.CurrentThread.CurrentUICulture = new CultureInfo("ar-SA");
- }
- else
- {
- Thread.CurrentThread.CurrentUICulture = CultureInfo.InvariantCulture;
- }
- Thread.CurrentThread.CurrentCulture = Thread.CurrentThread.CurrentUICulture;
- }
- }
- }
- }
Adding Controller
In this part we will add 2 Controllers.
- BaseController
We use BaseController in MVC that is inherited by all other controllers. In BaseController, we write common code that can be used in all the pages, for example by setting the language in the current thread for a multilingual site.
- HomeController
This Controller will inherit BaseController.
BaseController

Here is a code snippet of BaseController.
- using System;
- using System.Collections.Generic;
- using System.Linq;
- using System.Web;
- using System.Web.Mvc;
- using MvcLocalization.Helper;
- namespace MvcLocalization.Controllers
- {
- public class BaseController : Controller
- {
- protected override void ExecuteCore()
- {
- int culture = 0;
- if (this.Session == null || this.Session["CurrentCulture"] == null)
- {
- int.TryParse(System.Configuration.ConfigurationManager.AppSettings["Culture"], out culture);
- this.Session["CurrentCulture"] = culture;
- }
- else
- {
- culture = (int)this.Session["CurrentCulture"];
- }
- // calling CultureHelper class properties for setting
- CultureHelper.CurrentCulture = culture;
- base.ExecuteCore();
- }
- protected override bool DisableAsyncSupport
- {
- get { return true; }
- }
- }
- }

Here is a code snippet of HomeController.
- using System;
- using System.Collections.Generic;
- using System.Linq;
- using System.Web;
- using System.Web.Mvc;
- using MvcLocalization.Helper;
- using MvcLocalization.Models;
- namespace MvcLocalization.Controllers
- {
- public class HomeController : BaseController
- {
- public ActionResult Index()
- {
- return View(new Userdetails());
- }
- public ActionResult ChangeCurrentCulture(int id)
- {
- //
- // Change the current culture for this user.
- //
- CultureHelper.CurrentCulture = id;
- //
- // Cache the new current culture into the user HTTP session.
- //
- Session["CurrentCulture"] = id;
- //
- // Redirect to the same page from where the request was made!
- //
- return Redirect(Request.UrlReferrer.ToString());
- }
- }
- }
We will first work on _LoginPartial.cshtml because we will add a link button on this page to display it on all pages of the website / application.
_LoginPartial.cshtml code snippet
- @using System.Globalization
- @using MvcLocalization
- @using System.Threading;
- @if (Request.IsAuthenticated)
- {
- <p>
- Hello, @Html.ActionLink(User.Identity.Name, "ChangePassword", "Account",
- routeValues: null,
- htmlAttributes: new { @class = "username", title = "Change password" })!
- @Html.ActionLink("Log off", "LogOff", "Account")
- </p>
- }
- else
- {
- <ul>
- <li>@Html.ActionLink("Register", "Register", "Account",
- routeValues: null, htmlAttributes: new { id = "registerLink" })</li>
- <li>@Html.ActionLink("Log in", "Login", "Account",
- routeValues: null, htmlAttributes: new { id = "loginLink" })</li>
- </ul>
- }
- <ul style="margin-top:10px;">
- @{
- CultureInfo currentCulture = Thread.CurrentThread.CurrentCulture;
- <li><a href="/Home/ChangeCurrentCulture/0">English</a></li>
- <li><a href="/Home/ChangeCurrentCulture/1">Hindi</a></li>
- <li><a href="/Home/ChangeCurrentCulture/2">Marathi</a></li>
- <li><a href="/Home/ChangeCurrentCulture/3">Arabic</a></li>
- }
- </ul>
As we have decided for what language we will use that code.
English :- 0 | Hindi:- 1 | Marathi :- 2 | Arabic :- 3

When the user clicks on this link it will call the Home Controller ChangeCurrentCulture Action result and it will pass an id to it.
According to that CultureHelper will get input and it will set the Culture for the page.
Adding View for HomeController
For adding a View just right-click anywhere inside HomeController and select Add View.

After clicking Add View a new dialog will popup with the name Add View. Inside that you need to select:
- View engine: Razor.
- Model Class: Userdetails.
- Scaffold template: Create.
- Use a layout or Master page: Check this Property.

And click on the Add button.

When adding a view using a Scaffold template all the code for the view will be generated.
Index.cshtml code snippet.
- @model MvcLocalization.Models.Userdetails
- @{
- ViewBag.Title = "Index";
- }
- <h2>Index</h2>
- @using (Html.BeginForm()) {
- @Html.ValidationSummary(true)
- <fieldset>
- <legend>Userdetails</legend>
- <div class="editor-label">
- @Html.LabelFor(model => model.FirstName)
- </div>
- <div class="editor-field">
- @Html.EditorFor(model => model.FirstName)
- @Html.ValidationMessageFor(model => model.FirstName)
- </div>
- <div class="editor-label">
- @Html.LabelFor(model => model.LastName)
- </div>
- <div class="editor-field">
- @Html.EditorFor(model => model.LastName)
- @Html.ValidationMessageFor(model => model.LastName)
- </div>
- <p>
- <input type="submit" value="Create" />
- </p>
- </fieldset>
- }
- <div>
- @Html.ActionLink("Back to List", "Index")
- </div>
- @section Scripts {
- @Scripts.Render("~/bundles/jqueryval")
- }
Complete view of page
It's taking the default culture, English, when it loads the first time.

Here is the link we added.

Let's check it by clicking on Hindi first:

Now to click on Marathi.

And finally click on Arabic.

Conclusion
Finally we have completed Globalization and Localization in ASP.NET MVC 4. I hope you have enjoyed it.
You can download this code from the preceding link.
Like this article if you have enjoyed reading it.
No comments:
Post a Comment